Monday, November 30, 2009

Cat's tongue cookie?


Some of you are probably wondering what's cat's tongue cookie... Some of you (my fellow Indonesian people) would know already... hahaha.. It's called Kue Lidah Kucing in Indonesian. It's basically like a long and thin crisp cookie (somewhat like Milano cookies). And It's very Indonesian, I would say.. Because this recipe called for Blue Band. Blue band is Indonesian Margarine brand that is a staple to Indonesian household! This cookie is very simple to make with only few ingredients. The only thing is, the recipe is in metric measurement, which is in grams. But if you have digital scale, there would be no problem...

Here's the Mise En Place...
- Electric mixer with paddle and whip attachment
- Large bowl to sift the flour and also to fold in the whipped egg whites
- Spatula
- Sifter

The simple ingredients are:
  • 100 gr Blue Band margarine
  • 80 gr confectioner sugar / powdered sugar
  • 100 gr All Purpose flour
  • 2 egg whites
  • 1/2 tsp cream of tartar
  • 1/2 tsp vanilla extract

The easy easy step: Preheat oven 300F
1. In mixing bowl with paddle attachment, mix Blue Band and sugar in low speed until the mixture is combined. Speed up to high for 4-5 min. until the mixture is soft and fluffy. Add vanilla.
2. Sift flour in the big bowl. Put the flour into the mixing bowl a little bit at a time until combined.
3. Scrape well. And take the mixture back into the big bowl.
4. Wash the mixing bowl and wipe dry and clean! It's important to wash and dry it, otherwise the egg whites won't whip.
5. In clean mixing bowl with whip attachment, beat egg whites and cream of tartar in high speed until it becomes stiff peak. Here's the link if you want to know more about beating egg whites.. http://www.youtube.com/watch?v=cjuJfkxoATA&feature=player_embedded#
6. Fold the egg whites into the batter in the big bowl (1/3 of egg whites at a time). When you fold the egg whites, pleas do it carefully because you don't want to deflate the egg whites.
7. After it's all combined well, put the batter into the piping bag with big round tip.
8. Pipe it onto baking sheets lined with parchment paper or Silpat like a long strip (about 2 in. x 1/2 in.)
9. Bake it 300F for 25 min or until the sides and the bottom turn golden brown. (When you touch it after it came out from the oven, it won't be crispy immediately)
10. Let it cool at room temperature for 1 hour and enjoy!!!

I know the technique seems so complicated and a lot of things going on... But trust me, it's so easy to make! Pls dont hesiate to msg me if you have questions.
Monday, November 23, 2009

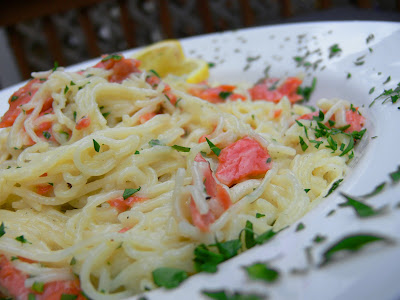
Delicious Smoked salmon pasta in bath of garlic, white wine, cream, and parmesan sauce! Need I say more?


Mmmhh... This pasta is soooo delicious! This is not your typical spaghetti and meatball because this recipe is so easy and simple to make!
Here here, let me start with all the procedures...
The mise en place is pretty typical... You'll just need big pot to cook the pasta and a big pan to fit the sauce and the pasta..

The ingredients:
  • 8oz. smoked salmon
  • 12oz. angel hair pasta
  • 1 1/2 cup heavy cream
  • 3/4 cup dry white wine (Something that you also want to drink)
  • 1 cup of grated parmesan cheese
  • 4 cloves of garlic, minced
  • 2 shallots
  • 2 tbsp butter
  • 1 tbsp oil
  • 1/4 cup chopped fresh parsley
  • 1/2 lemon
  • S+P+sugar to taste
Okay, here's how you make them:
1. Fill up big pot of water to cook the pasta. Add generous amount of salt in the water. When the water boils, add the angel hair and cook just to al dente. Pls read the direction on the box.
2. In a large sautee pan, add oil and butter and sautee garlic and shallot until fragrant and the shallot becomes translucent.
3. Add the wine and let it reduce to half in med heat.
4. Still with med heat, add the cream and reduce it to half again. Add a little bit of salt and pepper. I add a bit of sugar too to balance the acidity of the wine and lemon.
5. Add the smoked salmon and parmesan cheese (reserve a bit cheese left to sprinkle on top of the pasta later on.) Squeeze the lemon.
6. Add the al dente cooked pasta into the sautee pan and mix it all together until the sauce coats all over the pasta.
7. Now it's ready to serve. Just sprinkle chopped parsley and parmesan on top! Yummssss

This is a perfect easy meal on any weeknight, but it's also a great lazy meal for saturday dinner at home with a glass of white wine and a big slice of tiramisu! Who doesn't want those for a saturday night dinner?
Enjoy your week everybody and Happy Thanksgiving!
Hope you have a great great Thanksgiving and hope you eat enough turkey this week!

I cant wait to show you my first fondant cake for a surprise birthday party! Im gonna post it later this week.... Ciaooo


Thursday, November 5, 2009

Molten-Chocolate-Lava-Cake!

Need I say more people? The ooey gooey chocolatey goodness in one small cake. This dessert always been a favorite of mine in times of "chocolate-deprived" moments... It's the easiest dessert ever with no use of mixer! Can u believe that?

So here here, make this for your spouse tonight and he or she will love you even more! Of course to make this a complete "meal", you need to have a good scoop of Vanilla Ice Cream on the side... Hot and cold sensation in your mouth! Yummmmm.... R u drooling yet? R u drooling yet?

Here we go with the mise en place:
-four of 4oz. custard cups (here's the link if u don't know what a custard cup is http://cache.showmethecurry.com/vidimages/MoltenLavaCake.jpg)
-2 bowls (one of the 2 bowls need to be heat resistant, something like pyrex and not plastic because it's gonna be for the double boiler)
-whisk
-sauce pan filled with simmering water

I will go more into the details later. Don't panic if you don't know what I'm talking about!

Ingredients: (This recipe makes 4 cups, if it's for date night, please divide the recipe in half)
  • 6oz. dark chocolate (I use Ghirardelli semi sweet chocolate bar)
  • 6 tbsp butter
  • 1/2 cup sugar
  • 2 eggs
  • 1/2 cups of All purpose flour
  • 1 tsp Kahlua
  • 1 tsp Vanilla extract

How you do it:
1. First thing first. Preheat 400F oven. Lightly grease the custard cups.
2. Prepare the double boiler by filling the water into sauce pan about 2 in. and let it simmer in medium heat. Do not let it boil! Put the heat-proof bowl on top of the saucepan. So u're going to melt the chocolate and butter here.
3. After the chocolate mixture melts, take it off from the double boiler and whisk in the sugar, vanilla, and kahlua.
4. In the other bowl, lightly beat eggs.
5. This is important guys! Now it's time to temper the two mixture together. What is tempering?
Here's some explanation to help you if you don't know yet...
It means to bring the temperature of the egg mixture up closer to the temperature of the hotter ingredients you will be mixing it with to prevent the eqq from "scrambling". You need to add a small amount of the hot ingredients to the egg mixture, a little at a time, to bring the temperature up, until it is safe to add to the hot ingredients.
So now, add a little bit of the chocolate mixture into the eggs mixture and whisk whisk whisk until it's combined.
6. After that, carefully stir the egg mixture back into the chocolate mixture.
7. Whisk in sifted flour until just combined.
8. Add the batter into the custard cups and bake for 10-11 min.
9. Remove from oven and let it rest for 2 min. before you take them out.

The center should be soft and a bit sink in but the sides should be done. Invert cups on individual serving dish. Get a scoop or... two vanilla ice cream and dust in some powdered sugar on top. Isn't that sound almost too pretty to eat? mmmm maybe not... Enjoy while it's still warm and cold!

Wednesday, November 4, 2009

A delicious come back- Bacon, swiss cheese, and spinach quiche


Hello helloooo! Gosh, it's been over a month since I wrote my last blog! I was busy "training" at Chocolate Pink and now I'm taking a break from it... So now, having a lot of free time at home, I'm gonna be making and testing a lot of recipes for my blog! Weeee...

So today, for a delicious comeback, I'm gonna share a delicious recipe. This quiche has been always everybody's favorite every time I make it. A definitely must try recipe! It's great for breakfast/ brunch. My husband loves it for a Saturday late breakfast with a glass of Mimosa...


The mise en place:
-Bowls
-Whisk
-Pan for crisping the bacon

The simple ingredients:
  • 6 large eggs
  • 1 1/2 cups of heavy cream
  • A pinch of salt and pepper (not a lot of salt bcos bacon is already salty)
  • 2 cups of fresh baby spinach
  • 1 lb bacon
  • 1 1/2 cups shredded swiss cheese (Swiss cheese is not salty, but it's kinda sweet and chewy)
  • 1 frozen 9in. pie crust
The simple steps:
Preheat 375F oven
1. Cut up the bacon into small strips and crisp them up in a pan.
2. Meanwhile, whisk together eggs, cream, salt and pepper, and swiss cheese.
3. After the bacon is crisp, put them on bed of paper towel so it will absorb the excess fat. And then, with a LITTLE bit of extra bacon fat on the pan, sautee the spinach just until it wilts down (about 1 min.) If you have extra bacon fat, you can save it and use it for other uses, such as making bacon fried rice! It's the best!
4. Put the bacon and spinach into the bowl. Before you put the spinach in, make sure you kind of press the spinach to get rid off some excess water.
5. Whisk it all together and put them in the pie crust.
6. Bake for 45 min. or until the quiche is not jiggly anymore and the crust and the top are nice and brown.

I've been making this quiche probably more than 10 times and it never fails! Enjoy!

Tuesday, September 22, 2009

The drooling Nutella Swirl Pound Cake


I made this today and I think everybody wants to know and try this twisted classic recipe! The cake turned out great! So Soft and so nutella-y! I don't know anybody who doesn't like Nutella...
The picture that I posted was not the one that I baked today because my swirl didn't look that pretty. I guess I need to learn how to swirl beautifully! hehehe...
I adjust this recipe a little bit, just to balance the sweetness to my liking. I found this recipe from the Food and Wine Mag. and I immediately had a special connection with the recipe! hahaha...

Here's the Mise en Place:
- Mixing bowl with paddle attachment
-2 small/medium bowls
-Sifter
-Whisk
-Spatula
-Either 9x5 in. loaf pan or 8x8 in. pan that I used.
-Nonstick cooking spray

Here's the very simple ingredients:
  • 1 1/2 cups all purpose flour
  • 4 large eggs, at room temp.
  • 2 tsp vanilla extract
  • 3/4 tsp baking powder
  • 1/4 tsp salt
  • 2 sticks of butter, soft
  • 3/4 cups of sugar (The original recipe was 1 1/4 cups of sugar, YIKES!)
  • 3/4 cups Nutella
Here's the very simple steps:
1. Preheat oven 325F and spray the pan with nonstick spray.
2. Cream butter ans sugar together in med-high speed until light and fluffy. About 3 min.
3. Meanwhile, in one bowl, sift together flour, salt, and baking powder.
4. In another bowl, whisk eggs and vanilla lightly.
5. After the butter mix is light and fluffy, in low-med speed, gradually beat the egg mix until fully incorporated. Scrape.
6. Add the flour mix into 3 batches in low speed. Mix just until incorporated. Scrape each time you add the flour.
7. Final mix just until incorporated. About 10 secs.
8. Pour 1/2 of the batter into the pan. Add 1/2 of Nutella. Repeat that step again.
9. Take a bread knife or fork to make swirl.
10. Bake for 1 hour 15 min (for 9x5in. pan) or 50 min. ( for 8x8in. pan)

One of the thing that most people do when they bake is to Over mix the cake batter! You cannot overmix it if you want a fluffy cake! What I mean is when you are in the stage of adding the flour, just mix it just until incorporated. Not mixing it for 5 min. with the flour in because you want to make sure the batter is smooth, etc.etc.... So, the key is to go easy with your mixing once you add the flour.

So... Happy trying and keep your feedbacks comin! Or maybe if you have any request, let me know... Im gonna eat another piece of this cake now! With hot tea perhaps... Enjoying my day off's teatime!

Tuesday, September 15, 2009

Moist vanilla cupcakes with chocolate buttercream frosting


My sister said: Find a moist vanilla cupcakes with chocolate buttercream please... It's for her daughter's 1st birthday... My niece that I haven't met in Malaysia... Little Isabelle...

So I searched the recipes on the internet and I found this good review cupcake recipe at Martha Stewart's website. It's called Billy Vanilla Cupcakes. This recipe actually a very EASY recipes. Just mix the wet ingredients into the dry ingredients and bake it.. Pretty simple right?

The mise en place for this recipe is:
- Electric mixer with paddle attachment
- sifter
- 1 bowl to mix all the wet ingredients
- whisk
- spatula
- cupcake pan with cupcake liner

Here's the recipe: (This recipe suppose to make 30 cupcakes... I tried half recipe and I got only 10 cupcakes. Probably because I filled the batter a bit more)
  • 1 3/4 cake flour
  • 1 1/4 all purpose flour
  • 1 1/2 cups of sugar
  • 1 tbsp baking powder
  • 3/4 tsp salt
  • 2 sticks of butter, cut into 1 in. pieces
  • 4 large eggs
  • 1 cup whole milk
  • 1 tsp vanilla extract
The direction:
1. Preheat oven 325F
2. Line cupcake pan with cupcake liners
3. In the bowl of electric mixer, combine flours, sugar, baking powder, and salt. Mix on low speed until combined.
4. In another bowl, whisk egg, milk, and vanilla.
5. Add the wet ingredients into dry ingredients in 3 parts. Scraping WELL after each addition. Mix only until the ingredients are combine. DO NOT overmix if you want soft and moist cupcakes. The problem most people have is that they overmix the batter to make sure it's all incorporated. Remember, the more you mix the batter (containing flour), the tougher the cake will be because more gluten will develop.
6. Fill the batter 2/3 of full of the liner.
7. Bake for 17 to 20 min. Rotate the pan half way through the time.

Now... The frosting... I personally think that the recipe called too much sugar! I already reduced the amount of powdered sugar but it's still too sweet and it overpower the cake flavor.
So... here's the recipe: (For 30 cupcakes)
  • 4 sticks of butter, room termperature (whewww... a lot of butter! Yesterday I only use 1/4 of the recipe to ice 10 cupcakes. It's just about right)
  • 12 oz. semisweet chocolate, melted and cooled (Alternative, you can use bittersweet chocolate rather than semisweet so when you add the powdered sugar, it's not going to be too sweet)
  • 3 tbsp milk
  • 1 1/2 tsp vanilla extract
  • 2 1/2 cups powdered sugar
  • 1 tbsp khalua (this is not on the original recipe, I just add it to make it smell better!)
Here's how u make them:
1. In the bowl of electric mixer with paddle attachment, cream butter for 3 min. until smooth and creamy.
2. Mixer on low, add the chocolate until just combined.
3. Add milk, vanilla, and sugar.
4. Mix until combined. Do not evermix because the buttercream can break.

It's a pretty easy recipe, I shall say... It's great for parties and gathering... Happy trying and please leave a comment how it turns out...
Have a great great weekkkk!

Monday, September 7, 2009

Big Giant Chocolate Chip cookies


Sometimes you just need food that brings comfort to your soul. To me, one of my faves is Chocolate chip cookies and milk. This recipe is extra special because the cookies are super giant! If you have ever seen the "Throwdown with Bobby Flay" on Food Network channel, this cookie was one of the throwdowns. That means, it's really good! This original cookie idea is from Levaine Bakery in NY. My good friend, Ivana, told me about some food blog websites that has a "copycat" recipe of this cookie. Why not try it, right? The differences between this recipes and other classic recipes are the butter temperature and the amount of flour used. The butter used is cold butter so I guess that will make the cookie fluffier. Also, the flour used is more than the usual amount. So that makes the cookie heartier.

The mise en place:
  • Mixer with paddle attachment
  • Measurement cups
  • Baking sheets, sprayed with nonstick spray

The ingredients: (This will make 12 cookies)
  • 2 sticks, cold and cubed unsalted butter
  • 1/2 cup sugar
  • 3/4 cup light brown sugar
  • 2 eggs
  • 3 1/2 cups of all purpose flour
  • 1 tsp kosher salt
  • 3/4 tsp baking powder
  • 1/4 tsp baking soda
  • 1 1/2 cups chocolate chips
  • 1 cup pecan or walnuts, optional

Here's the steps:
1. Preheat oven 350F
2. In a bowl of electric mixer with paddle attachement, cream butter and sugars together until well blended and fluffy. Add one egg at a time, scrape well. Mix until well blended.
3. Add sifted flour, salt, baking powder, baking soda into the butter mixture and mix just until combined. You dont want to mix it too long because you dont want tough hard cookies, right? =)
4. Fold in the chocolate chips and nuts, if using. Scrape well and make sure everything is mixed beautifully...
5. Divide into 12 portions into baking sheets.
6. Bake them for 16-23 min. (Depends how u like your cookie. Mine is 16 min. because I like them to be super soft on the inside!)

Dont be tricked by the "raw" looks on the cookies by the time you take them out because the cookie will cook more and set after that. You want to let it cool for a little bit before you enjoy them with a glass of milk!

It's a must try cookies definitely! Especially if you feel like you need a dessert after a longggg day!


Sunday, August 23, 2009

Food and more food in Hawaii

Aloha! Good to be back from Hawaii! Not that it isn't a nice place... But home always makes you feel better, right? Obviously from the title, we ATE A WHOLE LOT in Hawaii. My hubby and I particularly went to Oahu, HI for our honeymoon for 6 days. I tell ya... Our stomachs digest a lot of food during that 6 days! Hawaii has GREAT food and I can say it's more expensive than our regular eating out price here... But hey! It's vacation!
I took some food photos while we were there and I hope I can make you droll and want to visit Hawaii and want to gain 10 pounds!

Here we go...

This is OXtail Ramen in Waikiki @ Ramen Nakamura. I thought it was okay because the soup base was a little bit to salty... Have to wait in line for 30-40 min.

@Curry House in Ala Moana Food Court. You can choose a VARIETY of things to go with the curry, such as takoyaki, katsu, squid, etc...! Mine is gyoza and chicken karage curry. Big portion!

Kapiolani Community College Saturday's Farmers Market. A lot of fresh and local food. Great walk for saturday morning! We tried this ginger pineapple drink... Not bad!

Famous shrimp truck in the North Shore... It's a simple garlic and butter shrimp with rice. I think it has nice flavors but we think it's a bit over priced and over rated. But hey, it's vacation!


@ North Shore again! We passed by this small road and saw a LONGGGG line for this shave ice. Okay, we've got to try Matsumoto Shaved Ice! It's good for a cup of shaved ice and tons of sugar syrups poured into the ice.... Plus the condensed milk!


You've gotta visit Dole Pineapple Plantation in Oahu right? Except you do have to PAY to taste the pineapple! Although I have to say the pineapple in Hawaii is SUPER sweet!!! We tried the famous Pineapple float( pineapple juice and pineapple whip- it's like ice cream) inside the pineapple souvenir thingy!

It's the famous restaurant that everybody goes because Anthony Bourdain went there! Yes, it's ONO Hawaiian Restaurant! Sadly, we thought the food was just ok! The flavor didn't have the PUNCH that we super highly expected!

Yes, it's the famous food in Hawaii! SPAM! This was our breakfast in a small "local cafe" close by our hotel and we enjoyed this breakfast very much! It's spam with 2 sunny side up eggs and rice. What a powerful meal to start the day!

This is the REAL DEAL! I mean.... This is probably one of the best food we ate there. I know it's just charsiu ramen and chicken teriyaki with rice and egg. But this is excellent food at it's best! It's in the Ala Moana Shopping Center and the restaurant called GOMA TEI. Most of the stuff on ther menu are ramen. So I decided to try thier charsiu ramen. Man.... It's probably the best ramen I've EVER had! The soup was flavorful... The meat is just falling apart with a bonus of pork fat! It's just soooo good! And my hubby ordered chicken teriyaki! It's superb too! He said the rice is sooo fragrant and the chicken is just seasoned perfectly. And the egg, of course, makes this meal complete. You HAVE to come to this restaurant whenever u're in Hawaii!


Well this is a MUST try food in Hawaii too... PUKA DOG! The hotdog was put inside of a crispy "hole" bun and with condiments like garlic sauce, pineapple relish, guava mustard, it makes puka dog just perfect! YUM!


L&L!Yes! We don't have this in Atlanta so I'm so craving for this Hawaiian fastfood chain restaurant! This is the first thing that we ate after we arrived in Hawaii and we were just starvinggggg! I ate LOCO MOCO! It's gonna sound wierd but it's good! Its rice, hamburger patty, fried egg, gravy, and macaroni salad on the side! Perfection! Someone is going to say gross over this! hahaha! And my hubby ate the MEAT combo, which has grilled barbecued chicken, short ribs, and thinly sliced beef. With macaroni salad on the side of course..

We enjoyed the food so much and I feel I ate so much meat in Hawaii that I crave for salad! All in all, it was a great honeymoon and a very relaxing vacation... Hope we'll go some other place next year (or next month... hehehe) and we'll be pigging out again!
In a mean while, I'll write more delicious recipes from my kitchin!
Have a great week everybody....


Sunday, August 9, 2009

Soulful Southern Fried Chickn

Yummmm! What could be more soulful than Southern Fried Chickn? Homemade Southern Fried Chickin I bet! I had almost expired buttermilk and I didn't want to waste it... So, I thought about fried chicken. Simple to marinade, easy to fry, satisying to eat!
It's been few months since I use Cornish Hens instead of Hormone Added- Huge chicken... And I don't want to go back using the humongous whole chicken because I just don't think it's natural.
So for this recipe, I use 2 Cornish Hens.

Here's the simple ingredients:
  • 2 whole Cornish Hens (Cut 8 part/ chicken)
  • 1/2 gallon buttermilk
  • 3-4 tbsp salt
  • 3 tbsp pepper
  • 3 tbsp paprika
  • 2 tbsp garlic powder
  • 3 cups all purpose flour, seasoned with S+P

The steps:
1. Combine buttermilk, salt, pepper, paprika, and garlic powder for marinade.
2. Put the chicken into the buttermilk pool and refrigerate for 2 days! Yes, 2 days!
3. Preheat deepfyrer 325F
4. After 2 days, coat the chicken with flour mixture. Not to thick...
5. Fry for 20-25 min.

The skin is super crunchy outside (It's like KFC fried chicken skin!) and the meat inside is SUPER moist and juicy! (Not kidding!)
Even the breast is soooo moist. And the meat is really flavorful. All that marinade soaks into the chickn! You've got to try this whenever u're just craving for a GOOD fried chicken!

My husband and I ate almost all of them! Oh btw, we are going to HAWAII for our real honeymoon this Tuesday! I'm SUPER EXCITED! Aloha, here we come!
I'm gonna post the pictures of all the food that I ate there! I'm sorry if you drool from here....

Mahalo everybody!

Thursday, August 6, 2009

Satisfying Thai Basil Fried Rice


Favorite favorite favorite fried rice! Check any of your favorite ingredients below:
  • Rice (check!)
  • Thai basil (check!)
  • Shrimp (check!)
  • Chinese pork sausage (check!)
  • Shrimp balls (Check!)
  • Pork fat (CHECK!)
I think all Indonesian people LOVE fried rice... And it's super easy to make! Because Thailand is our neighbor, we kinda use the same spices and ingredients for cooking. And because I have a little pot of Thai Basil plant at home, I decided to use them up today. I love growing herbs at home!

Okay, here's about me and cooking food and writing recipes... If I take the recipes from a website, that's no problemo at all. But if I come up with the recipe myself, I kinda eyeball eveything and I don't really have perfect measurement for the ingredients. So u're gonna see "one bunch of this, one pinch of that, etc etc." I always go by the taste if it needs more seasoning or not. But I'll try to write the recipe as accurate as possible...

Basically you can put any meat or vegetable in this fried rice.. It depends what you have on ur fridge and what u like really. I made a vegetarian stlye one time for my friends.

There's no really Mise En Place for this recipe. Just have big pan to fit all the ingredients!

Serving size: 4 hungry people
Here's the ingredients:
  • 6 Cups of cooked rice , cook your rice with a little bit less water so it's not mushy when u cook the fried rice.
  • 1 Cup peel and deveined shrimp
  • 1 Cup thinly sliced chinese sausage
  • 1 Cup shrimp balls, cut in half
  • 1 Cup of thinly sliced cabbage
  • 3 cloves of garlic, minced
  • 1 shallot, minced
  • 2 tbsp Kokita bumbu Nasi goreng sedap
  • 2 tbsp Crispy Prawn Chili (I got this from my sister in Malaysia but u can definitely buy this at Asian grocery store in Malay or Thai section)
  • 1 Cup of Thai Basil (U can also buy this at Asian grocery store or u can buy the plant at Home Depot and have a little herb garden at ur house)
  • 2 large eggs
  • The secret ingredients: 1 tbsp Pork Fat (Believe me, this makes a difference! Don't be scared of this...)
  • Pepper
  • Fish Sauce (about 3 tbsp)
  • Sweet soy sauce (about 3 tbsp)

Here's how u make it:
1. Put a little bit veg. oil on the pan and put the chinese sausage and just let them get crispy a bit on the outside.
2. Add your pork fat, garlic, shallot, Bumbu Kokita, and Crispy prawn chili until it smells yummy and delicious.
3. Crack the eggs in the middle of the pan and let it cook and just scramble it a little bit.
4. Add the shrimp and shrimp balls and sautee it until the shrimps cooked (not too long!)
5. Add all the rice.
6. Add pepper, fish sauce, and sweet soy sauce. Just stir it all together until combined.
7. Add the cabbage and basil and stir it until they wilt.
8. Adjust the seasoning.

Really full from dinner... This is definitely a filling meal. But there's always room for dessert, right? I think I'm just gonna eat whatever dessert I have in the fridge. I think... there's blueberry peach tart from Emily =) Or coconut pecan tart from Emily too =)
Enjoy your dinner time everybody!


Tuesday, August 4, 2009

The B-A-N-A-N-A Bread


Got overripe bananas at home and about to throw them away coz they are already black and not too appetizing? PERFECT! They are the right ingredient for Banana Bread!
It's breakfast time and I promised my hubby that I'd make him banana bread. He doesn't want chocolate chip nor nuts in it. Just plain ol' banana bread... And as he always says, if you are weak or sick, the only thing that can cure you is banana!

From this post on, I'm gonna tell you about MISE EN PLACE of every recipe... Yea yea I know it sounds too French culinary term but basically it means "everything in place." It's just the tools and ingredients you will need to make the recipe. Because it's a waste if you already have all the ingredients for this banana bread but you don't have a whisk attachement for the mixer, for example. So I will give you some sort of like a check list of the tools you need. Of course for the ingredients, you can check on the ingredient lists.

So in this recipe, the Mise En Place are:
  • Food processor (Ask your spouse for birthday gift!)
  • Mixer with whisk attachment, preferably Pink kichen aid mixer... hahaha (Ask your spouse for Christmas gift!)
  • Greased 9x5x2 in. pan (I prefer to use 8x8 in. pan just because it's not too thick)
  • Sifter

The ingredients are:
  • 10 tbsp. butter (1 1/4 stick of butter), room temperature
  • 1 cup mashed ripe bananas (2 large or 3 med bananas)
  • 1/2 cup sour cream
  • 2 large eggs
  • 1 1/2 tsp vanilla
  • 2 cups cake flour
  • 3/4 cup sugar
  • 1 tsp baking soda
  • 3/4 tsp baking powder
  • 1/2 tsp salt
  • chocolate chips or nuts, optional

So the ingredients are pantry-friendly stuff that you have at home, right?
And ohhhh, it's smelling so good now! My banana bread is in the oven...

Here's how you make it:
1. Preheat oven 350F
2. Puree the bananas, sour cream, eggs, and vanilla in the food processor.
3. Sift flour, sugar, baking powder, baking soda, salt into mixing bowl. Mix on low speed for 10 secs. to make sure it's combined well.
4. Add the butter and start with low speed until it's combined with the flour. If you go to med speed like I just did, the flour will be ALL OVER you and your kitchen! Yes, it was! hahaha.. So when it's combined, turn it up to med low speed for 30 secs.
5. Add the banana mixture in 3 batches. Be sure to SCRAPE the side and the bottom of the bowl.
6. If you add choco chips or nuts, fold them in with spatula.
7. Pour the batter in the loaf and bake it for 45 min. (if using 8x8 in. pans) or 1 hr. 10 min. (if using 9x5x2 pan.


Enjoy the warm, smell good, soft, satisfying banana bread and be sure to make it for a weekend breakfast for somebody you care or love. They won't mind to give you a massage after. =)


Sunday, August 2, 2009

Perfect Saturday Homemade Dinner ~ Braised Short ribs and classic mashed potatoes


Falling off the bone short ribs meat, rich red wine sauce, fluffy creamy mashed potatoes, and chocolate cupcakes. What can beat that for a perfect Saturday nite dinner with my lovely hubby? It was melting in your mouth meal that satisfy all your senses... I tell ya... The key to your man's heart is thru the belly!
I got this recipe from foodtv.com, in particularly from Chef Anne Burrell. This is the second time I made the short ribs and this recipe proves to have perfect result everytime. It takes a WHILE to get the outcome but it's not that difficult really... The LONG part is only the oven part, which you don't really have to do anything while it's in there.

Here's the ingredients that you'll need:
  • 6 bone-in short ribs (about 5 lbs)
  • 1 large onion, cut into 1/2 in. pieces
  • 2 ribs celery, cut into 1/2 in. pieces
  • 2 carrots, peeled, cut into 1/2 in. pieces
  • 3 cloves garlic
  • 1 1/2 cups tomato paste
  • 2-3 cups hearty red wine (I use Bordeaux, it's kinda sipcy but it's perfect for this... Trader Joe's has French Bordeaux wine for only 6 bucks!)
  • Water
  • 1 bunch fresh thyme, tied with kitchen string
  • 2 bay leaves
  • S+P (I always use kosher salt)

The steps:
1. Season short ribs with salt (A LOT).
2. Coat a pot large enough to fit all meat and vegetables. Get the pan hot and sear EVERY side of the ribs. Do not overcrowd the pan.
3. While the meat is searing, put the garlic, carrot, celery, onion into food processor and puree until they become coarse paste.
Preheat oven 375F
4. When the ribs browned, set them aside and drain the fat from the pan. Coat the same pan with new oil and add pureed vegetables. Season the vegetables with salt (A LOT) and brown them about 5-7 min.
5. Add the tomato paste and brown for 4-5 min at med heat, otherwise it's gonna burn.
6. Add the redwine and let it reduce by half.
7. Add the ribs back in the pot, add thyme and bay leaves, and add the water until it just covers the meat.
8. Put it in the oven for 3 hours. Check periodically during cooking process and turn the ribs oven halfway through cooking time. The last 30 min. take the lid off to let the liquid reduce and becomes a yummy sauce.

The outcome should be falling out of the bone short ribs and I bet the perfect match of this ribs is mashed potatoes! It's very simple recipe..

What you'll need:
  • 2 large russet potatoes
  • 3/4 cups of heavy cream
  • 1/2 stick of butter
  • parmesan cheese, optional
  • S+P to taste

The steps:
1. 30 min. before the ribs done. Peel and cut the potatoes and boil them until tender.
2. Meanwhile, put the butter and heavy cream in a pot and heat it just until boils.
3. When the potatoes are done, drain them, and put it back on the same pot. Mashed them away and pour the heavy cream mixture as you're mashing. Spinkle parmesan cheese and season S+P to taste.

In fine-dining restaurants, this braised short-ribs will cost you some money! But it's not that hard to make them actually... And it will taste a lot better, I promise! If your spouse's birthday is coming, this is the perfect birthday treat for him/her! U'll get compliment all day long!


Wednesday, July 29, 2009

Roti Boy (Coffee Flavored bread with a melted brown sugar butter filling)


Okay.. This bread is originally from Malaysia where they just sell one type of bread! It's how good this is! You can smell the coffee aroma from far far away... It is best consumed when they just come out from the oven! Seriously! The melted butter on the inside and the crispy coffee flavored topping and the soft sweet bread are simply irresistible! I don't really drink coffee but I bet this bread is a soulmate of coffee!

There are 3 parts of making this bread. I know.. I know.. It seems like it's a lot of work! But I tell you that it is worth every bite!

This is the second time I made it and it came out better than the first time I made them.
The first part of this bread is making the yummy Filling:
  • 1 2/3 sticks of butter
  • 1/2 tsp vanilla
  • 1/3 cup brown sugar

Here's how you make it:
1. Beat in butter in mixer on medium speed with paddle attachment for 3 min.
2. Blend in vanilla and brown sugar.
3. Spoon in mixture into bowl and refrigerate until firm.
4. Divide mixture one tbsp per portion and shape into a ball. Keep refrigerate until ready to use.

The second part is making the Topping:
  • 1 2/3 sticks of butter
  • 1 1/3 cups powdered sugar, sifted
  • 3 eggs, lightly beaten
  • 1 tsp coffee flavoring
  • 1 pinch ground cinnamon
  • 1 2/3 all purpose flour, sifted

The steps:
1. Beat butter and icing sugar in mixer with paddle attachment on med speed for 5 min. until mixture is light and fluffy.
2. Gradually beat in eggs.
3. Mix in coffee flavoring.
4. Sift flour onto mixture and mix on low speed until combined.
5. Refrigerate until ready to use.

Now... The third part is the important part, which is the Bread:
  • 3 1/2 cups of bread flour
  • 1/2 stick of butter, softened
  • 1/3 cup of sugar
  • 1 tsp salt
  • 1 1/2 tsp yeast
  • 1 egg, lightly beaten
  • 270 ml milk

Here's how you make 'em:
1. Mix sifted flour, sugar, and salt in mixer with dough hook on low speed for 1 min.
2. Mix in yeast.
3. Combine egg and milk. (I always put the milk in the microwave for 1 min before I mix it in)
4. Mix on low speed for another min.
5. Mix on med speed for 8 min.
6. Mix in butter. Mix for 5 min. on med speed until soft, smooth, and elastic (but not sticky) dough forms.
7. Shape dough into a ball.
8. Divide the dough into 55gram portion (honestly I didn't even measure each portion... I just divide it into 12 portions).
9. Roll each portion into a ball. Cover them with plastic wrap for 10-15 min.

To shape the buns:
  • Flatten a ball of dough with the palm of your hand.
  • Place a ball of filling in the center of the dough.
  • Gather the edge and pinch to seal (Be SURE to seal WELL or the filling will LEAK out during proofing or baking! Yeah, the first time I made this, the filling leaked during the proofing and I couldn't save them so be sure you pinch it tight!)
  • Roll it onto a ball (The second time I made this bread, I put the side that I pinch on top)
10. Place each bun about 3 inches apart on greased baking trays.
11. Proof for 45 min. in a warm place
12. Pipe the topping on top of the buns in a spiral.
13. Bake in preheated oven at 390F for 12-15 min. or until buns are slightly brown and smell delicious!!!

Yes, it requires quite some time to make this bread but if you have a SPARE time at home, pleaseee do give it a try! It is mouthwatering delicious!
For variations, you can only make the sweet dough and you can fill 'em with anything you want really! I put banana and nutella inside! Yummmm! Or you can try ham and cheese or you can make a "hotdog" style bread by putting sausage, ketchup, and mustard. I think I'm gonna try that next time.

Enjoy baking at home and sharing with people you love...


Wednesday, July 22, 2009

Peanut butter Swirly Brownies


My first post of this food blog! Weeeeee
Yesterday my girlfriend, Tiffy and I were trying out this recipe from the "The art and soul of Baking" book called Peanut Butter and Chocolate Marble Brownies. Yummm!
For those who like peanut butter and chocolate, this is an easy and delicious recipe!

Here, here the ingredients:
  • 5oz. semisweet chocolate, finely chopped (I always use Ghirardelli baking chocolate, it's the best!)
  • 1 stick (4oz.) of butter, at room temperature
  • 1 1/2 cups light brown sugar
  • 3/4 cup creamy peanut butter (I use JIF, but you are welcome to use your favorite peanut butter).
  • 3 large eggs, at room temperature
  • 2 tsp vanilla extract
  • 1 tsp of rhum, optional (I always put rhum in any dessert!)
  • 1 1/4 cups all purpose flour
  • 2 tsp of baking powder
  • 1/2 tsp of salt
  • 1/2 cup chopped peanuts, optional (I didn't use it in my brownies)

Here's the steps:
1. Preheat oven 350F. Spray a 13x9 pan with non stick spray.
2. Cream the butter and brown sugar together in med high speed for 5 min. or until they are light in color. In a mean while, prepare the chocolate and flour mixture.
3. Melt the chocolate over a double boiler (here's a definition of double boiler just in case if you don't know what it is http://en.wikipedia.org/wiki/Double_boiler)
4. Sift the flour, salt, and baking powder together.
5. After the butter mixture is done, add the peanut butter and mix at med high for 30 secs.
6. Crack the eggs with fork to blend and witht he mixer running med speed, add the eggs one tablespoon at a time. Add the vanilla. Scrape the bowl (It's very important to scrape the bowl because you want to make sure everything is well blended).
7. At the lowest speed, add your flour mixture all at once just until combined. Scrape again.
8. Stir half of the peanut butter mixture into the melted chocolate.
9. Pour the rest of peanut butter mixture into the prepared pan. And then on top, add the chocolate mixture. And then swirl the two mixtures together with a fork or small pairing knife.
10. Bake it in the oven for 30-40 min. (Yesterday it took me only 30 min)

After it came out from the oven, we just can't resist to try it. Tiffy ate it with french vanilla ice cream! mmmhhh.. Super good!
A glass of milk wouldn't hurt either...
So hopefully you droll by now and you want to try out this recipe and eat it yourself or just share with your lovely ones.

I can't believe I enjoy writing this food blog as much as I am trying out new recipes!
Let me know if you have any questions or comments...